

The 30-Day Blueprint: How to Get Your Life and Assets Organized

Published August 26, 2026
Getting organized can feel like an overwhelming task. When we think about estate planning, end-of-life arrangements, or simply keeping track of our modern digital footprint, it’s easy to push it off. But there is no better time than right now to get your house in order.
Over the next 30 days, you can gain total clarity into your accounts and assets, ensuring everything is safely stored and easily accessible for your loved ones when they need it most.
To make this process seamless, let’s break down how to build your digital vault step-by-step. Ready to take control?
Open your Shelter today and get your first month free to start building your vault.
Step 1: Laying the Foundation and Setting Up Access
Before diving into documents and accounts, you need to establish the structure of your vault and bring the right people into the loop.
- Sign Up for Your Account: It’s free for the first 30 days, making now the perfect time to build your Shelter and get your first month free.
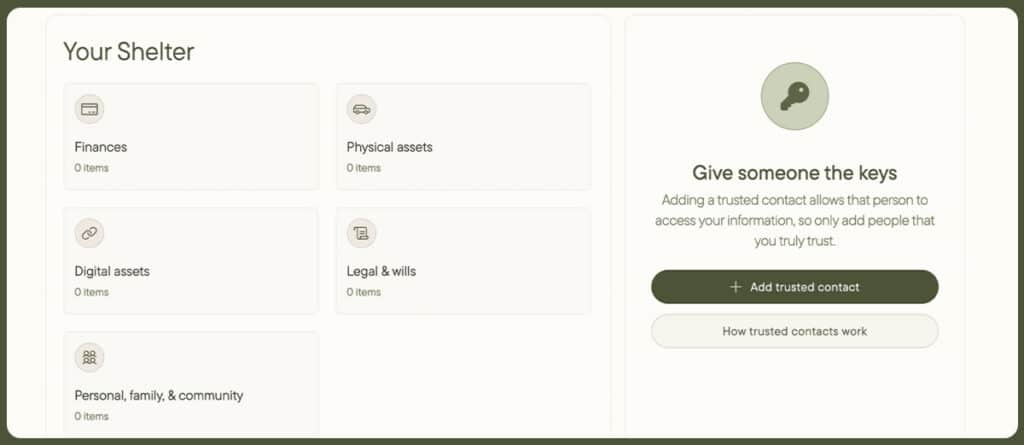
- Familiarize Yourself with the Categories: Review the structure of your new digital vault by exploring its five main categories: Finances, Physical assets, Digital assets, Legal & wills, and Personal, family, & community.
- Involve Your Family: Tell your family that you’ve signed up for a secure digital vault to store details on accounts and assets they will eventually need to know about, and identify the specific people you want to have access.
- Add and Confirm Trusted Contacts: Invite your Trusted Contacts by entering their names and email addresses. Decide whether you want to give them immediate access once confirmed or set up a delayed access option (where they must request access and wait a specified number of days, defaulting to full access if you do not respond due to incapacitation or death).
Step 2: Organizing Your Finances
Finances form some of the most critical accounts your loved ones will need to navigate. Tackle them category by category:
- Bank Accounts and Credit Cards: Gather your bank names, online access information, and account details. Verify that your usernames and passwords work, add them to your bank and credit card folders, and attach screenshots if helpful.
- Retirement and Investment Accounts: Compile details for your 401(k), IRA, pension plans, and investment accounts. Document login methods, beneficiaries, and the intended goals of each investment.
- Loans and Insurance: Record all loans (mortgages, auto loans, personal loans) along with their lending names and access details. Follow this by cataloging all insurance policies—life, health, disability, homeowners, and auto—noting coverage amounts and beneficiaries.
- Subscriptions and Ongoing Services: Track recurring payments like monthly charitable donations, newspaper subscriptions, and streaming services in your ongoing services folders.
Step 3: Cataloging Physical Assets and Technology
Physical belongings and everyday technology require careful documentation so nothing is lost, overlooked, or accidentally discarded.
- Real Estate and Valuables: Add real estate details—including property types, associated loans, and the physical location of deeds. Securely document valuable jewelry, heirlooms, and memorabilia in your valuables folder.
- Vehicles: Log cars, motorcycles, RVs, and boats with details like make, model, associated loans, and the physical location (or digital attachment) of the title.
- Cell Phones and Technology: Store your cell phone PIN code. This is crucial not only for navigating family photos and contacts but also because loved ones may need to receive two-factor authentication text codes to access other vital online accounts. Do the same for computers and tablets.
- Storage Units and Other Items: Document the location, access details, and contents of any off-site storage units, alongside a catch-all folder for unique physical goods.
Step 4: Securing Digital Assets
In today’s digital age, online accounts require just as much attention as physical property.
- Email and Social Media: Your email is often the most vital asset for resetting passwords and verifying accounts. Document your login credentials and account purposes. Similarly, catalog social media accounts so loved ones can properly memorialize, close, or secure them against identity theft.
- Cloud Storage: Save login and account details for cloud storage services like Dropbox, iCloud, or OneDrive so family members know where your digital files and photos reside.
Step 5: Legal, Medical, and Personal Wishes
The final leg of your journey covers essential legal documentation and personal legacy information.
- Identification and Legal Documents: Record the physical locations—and upload digital copies where appropriate—of your driver’s license, passport, birth certificate, and Social Security card. Upload your Will and Advance Directives (living wills), noting their exact physical locations and court files.
- Taxes and Records: Store past tax returns and the contact information of your tax professionals, alongside court orders or guardianship documents.
- Medical and Personal Contacts: Save relevant medical conditions, family notes, professional or community contacts, and organizational ties.
- Death Arrangements and Last Wishes: Clearly articulate your final wishes regarding burial, cremation, and funeral home contacts, leaving behind a meaningful message for your family.
Give the Ultimate Gift of Clarity
Taking the time to build your vault transforms a potentially stressful, chaotic process into a clear roadmap for the people you care about most. It’s the greatest gift of comfort and clarity you can give your family—saving them headaches and allowing you to get back to living, making memories, and savoring every moment.

Build your Shelter today and get your first month free.
For you. For your loved ones. Peace of mind has never been more affordable.